
Nowadays, it is prudent to protect your privacy when downloading torrents on the net. A few lawsuits have recently been brought against ISP’s by businesses seeking damages from users allegedly downloading illegal content. Many of these lawsuits have centered on trying to force the ISP’s to release lists of customer IP addresses along with their associated activity logs. In this post you will learn how to install a VPN on a Pfsense appliance and when correctly set up, all your Transmission traffic will subsequently go through the VPN.
Unlike my previous post which teaches you how to install the OpenVPN in a FreeNAS Transmission jail to ensure only protected traffic is tunneled through our BT client, this post uses a MUCH MORE CONVENIENT method using PFsense hardware. In my experience, this process is WAY easier that the previously used method of installing software in the Transmission jail. Just so we’re clear, this post is NOT meant to be a tutorial on how to set up FreeNas. There are many ways to configure the FN server that depend largely on your system architecture – so head on over to the FN forums if you have basic operational questions.
This how-to works with Torguard though it might work with other VPN providers as well (your mileage may vary). This tutorial assumes you have your Freenas server setup and working correctly and that you have installed and tested the Transmission plugin to your satisfaction. I am currently using Torguard for VPN and I can highly recommend them as they offer many locations worldwide, are reasonably priced and have excellent customer service when you need it. You will need a VPN provider in order to get this how-to going so click the button below to check them out:
Click Here to Try TorguardIf you can’t see the button above please disable your ADBLOCKER for my site. I promise will never give you ads or track you in any way, but unfortunately the ad blockers see the link in the button as an ad and erase it from the displayed HTML. Thank you for your cooperation!
Here are the steps I followed to get VPN working with a PFsense appliance (version 2.4.4-RELEASE-p3) on my FreeNas 11.2 server:
- You will need a VPN provider in order to get this going. Click here to try Torguard
- We need to create a certificate so the VPN will trust us. Login to Pfsense and click: System > Cert. Manager > Create CAs to create a new certificate. We need to import Torguard’s certificate from their website so under ‘Method’ select ‘Import an existing certificate authority’ and paste in the torguard ca.txt data. Click ‘save’.

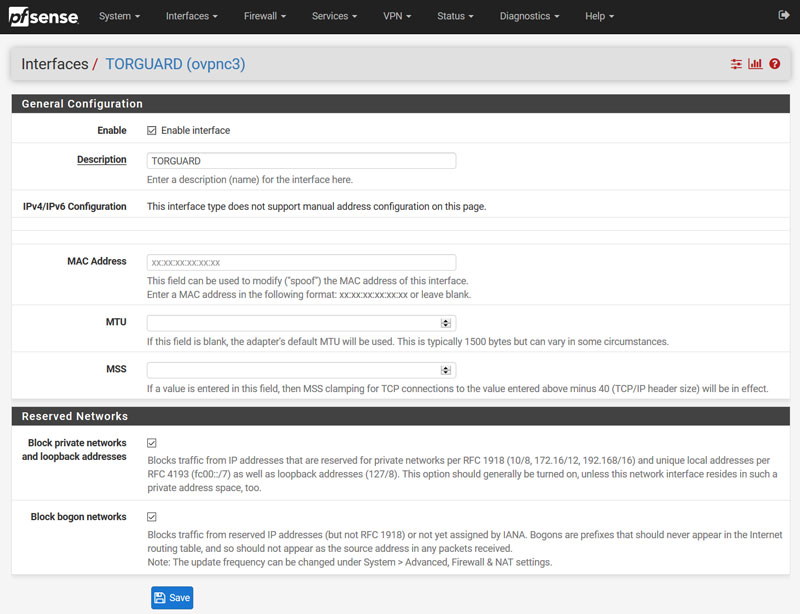
- Next, navigate to: Interfaces and create a new interface. I called it TORGUARD.
- Now head over to: VPN > Open VPN > Clients and click the + Add’ button. We now need to populate the Client dialog box(s) as shown below:
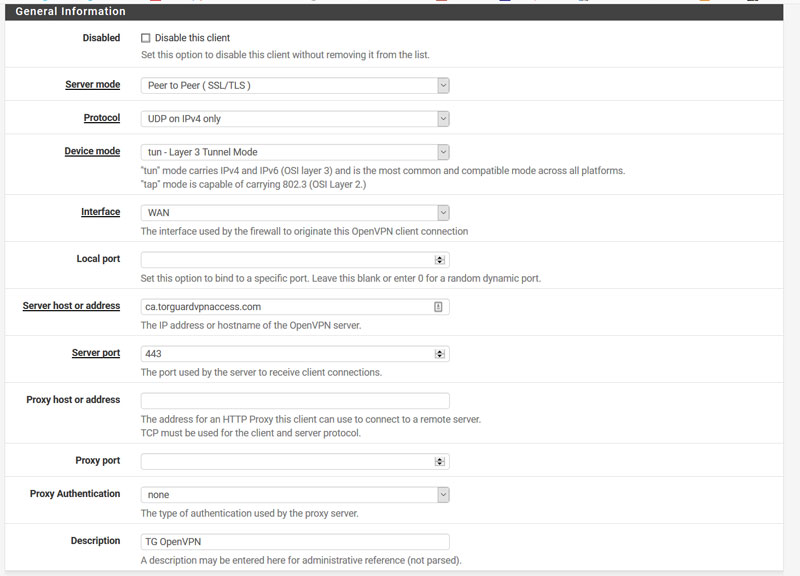
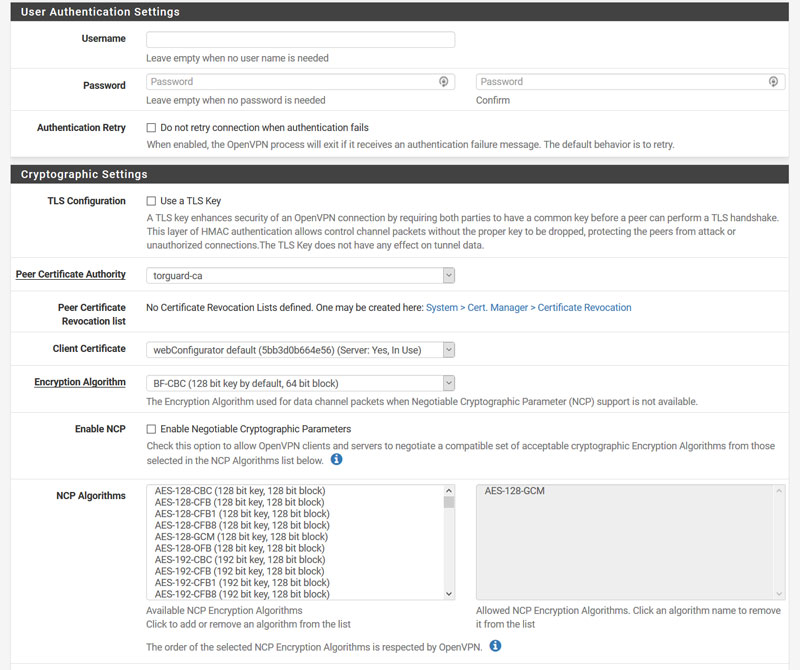
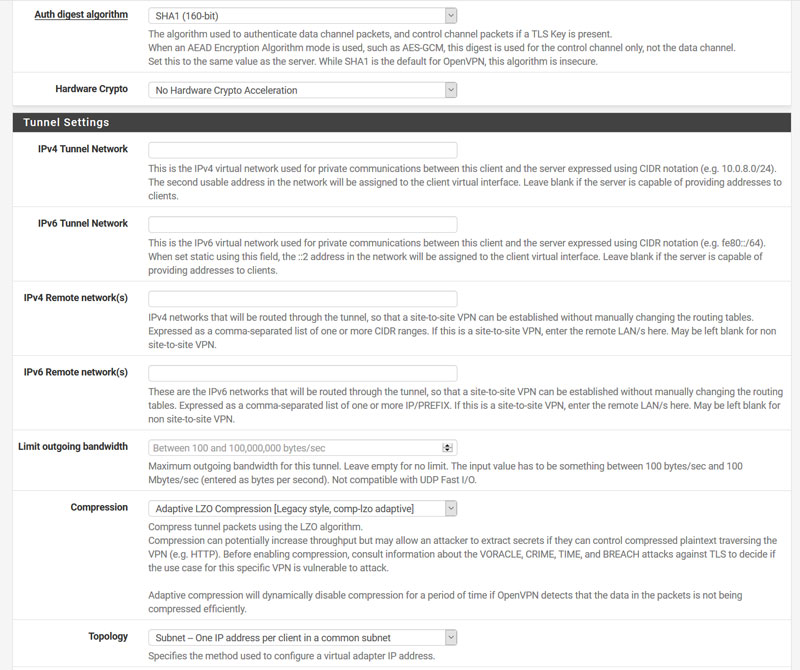
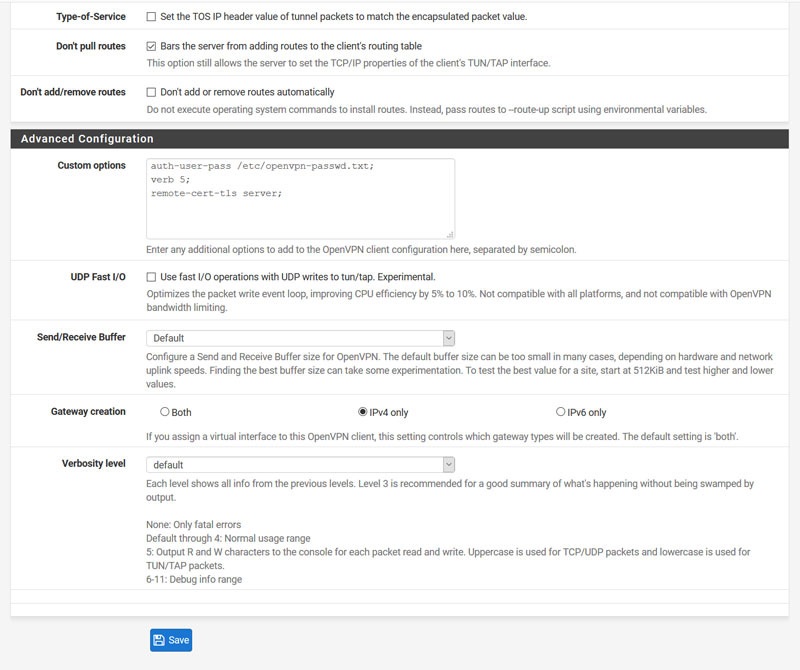
- **A few items to note from the boxes above:
5a. In custom options add:
auth-user-pass /etc/openvpn-passwd.txt;

verb 5;

remote-cert-tls server; - 5b. Setup the password file for the above box:
Navigate to Diagnostics > Edit file
Write: /root/vpnpassword in the Save/Load from path box.
Add your TorGuard VPN username and password on the first and second line then click save.
*You can also put your name and password in the above dialog box instead, if you want. If you enter the UN/PW in the dialog, omit this step and remove the auth-user line from custom options.
-
- Create an ALIAS to your Transmission internal IP. Navigate to: Firewall > Alias > IP and create an alias for transmission to your internal IP. Call it ‘Transmission’ (you will use it below). Aliases are a very useful feature in Pfsense and I use them all the time as it makes it easy to remember your devices with friendly names.
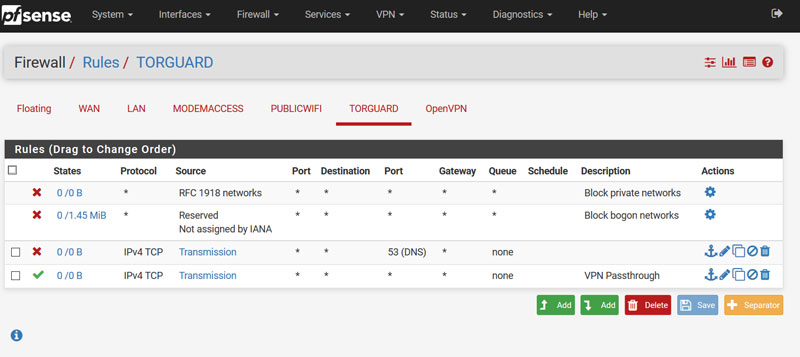
- Now we need to add some firewall rules to pass traffic to our VPN. Navigate to Firewall > Rules > TORGUARD and enter the following rules as listed in the image below (note the use of the alias we created above in the rule):
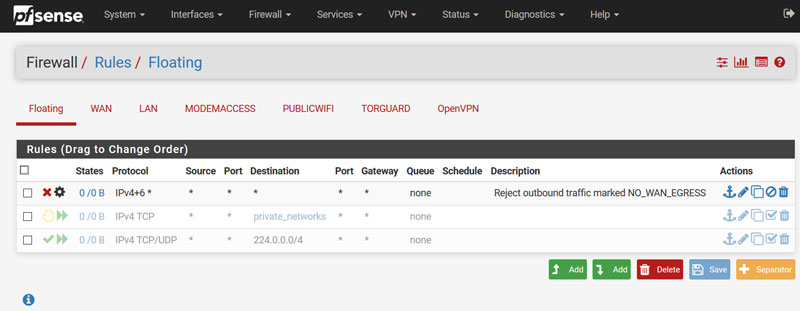
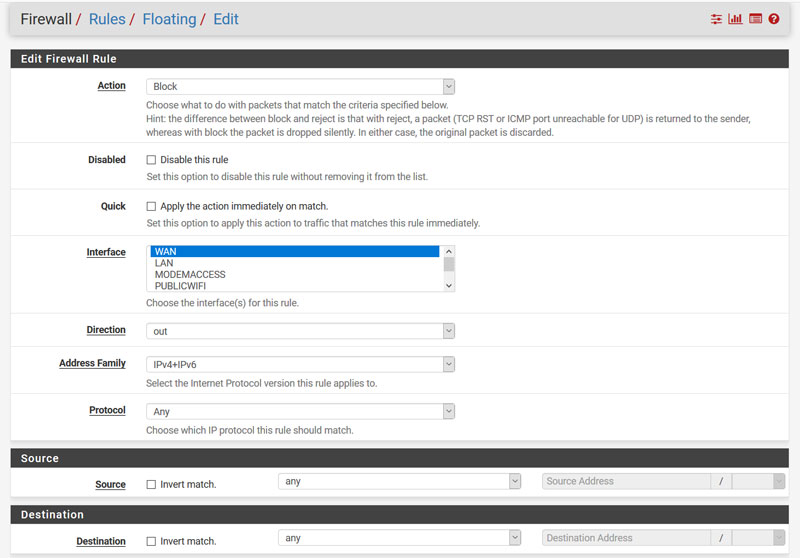
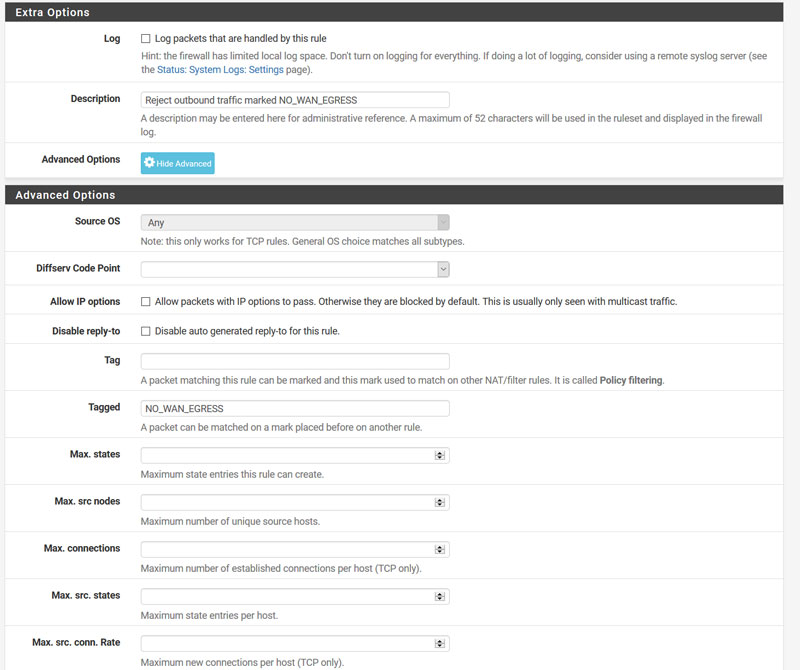
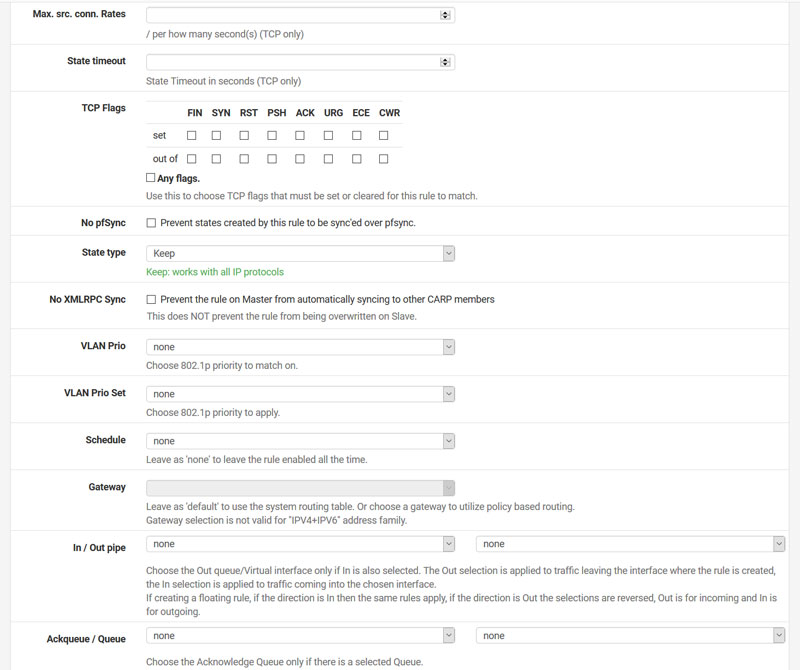
- Now we need to add a Floating Rule to prevent torrent traffic leaking out through our regular network if Torguard is offline or not corrected for some reason. Navigate to: Firewall > Rules > Floating and create a new rule as shown in the images below:
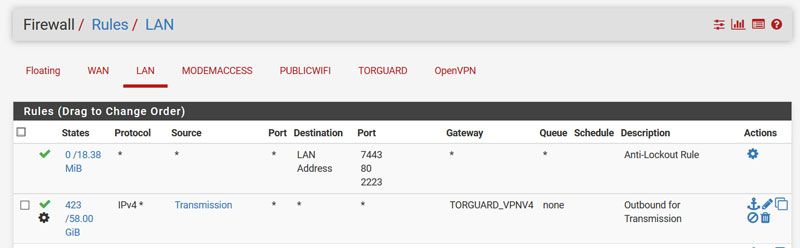
- Now add a lan rule by navigating to: Firewall > Rules > Lan as shown in the image below:
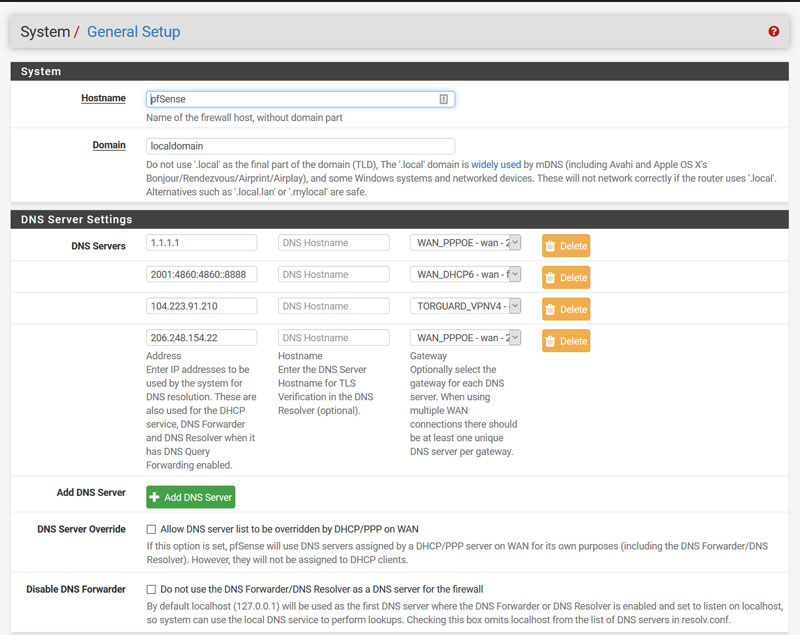
- Set up DNS for Torguard. Navigate to: System > General Setup and configure the DNS for the Torguard interface we created in Step 3 as per the image below:
- Testing your installation for DNS leaks. According to the WIKIpedia, a DNS leak refers to a security flaw that allows DNS requests to be revealed to ISP DNS servers, despite the use of a VPN service to attempt to conceal them. So given that information, we want to make sure our VPN is working correctly and not leaking your identity.
Install curl in your Transmission Jail (If it’s not already installed):
pkg install curl
#Run ipleak and check the json data
curl href="https://ipleak.net/json/
Still not working? Check this post for clues (it’s a good troubleshooting primer as well). Just telling me it’s not working does not provide enough information to troubleshoot your problem. You wouldn’t take your car into the garage and say, “my car doesn’t work!” – you need to give me some clues to help you fix your problem. Check your steps carefully, every command has to be issued as it is shown in the how to. If you find any mistakes please let me know and I will fix them right away.